PlutoT6 Server & IW4Admin on Ubuntu 20.04
-
This guide goes over the complete setup of a PlutoT6 server & IW4Admin on Ubuntu 20.04. Running Windows on a VPS or bare-metal server can be expensive with licensing costs and many server operators have a preference for Linux (myself included).
As an example, this guide will go over the setup of a PlutoT6 Zombies server & IW4MAdmin. The same concepts should apply to multiplayer, however you will need to adjust your
dedicated.cfgfile accordingly.Before we start, I'd like to give a huge shoutout to Minami for their original guide on setting up a PlutoT6 server on Debian. Many portions of their guide have been used to put together this guide.
Prepare a VPS/Bare-Metal Server
The first thing you need to do is have a VPS or bare-metal server ready to go with Ubuntu 20.04 LTS installed. We will not be using a desktop environment in this guide.The PlutoT6 server is not very resource intensive, however I recommend a server with at least 2 CPU cores & 4GB RAM for best performance.
Login to the server as root, or become root with the below command. Note: To make things easier on yourself, it's best to just use a root user. Make sure you are securing your server using key-based authentication and implement a firewall solution, for example with UFW.
sudo suUpdate apt cache and update all packages
apt update && apt -y full-upgradeInstall Wine
dpkg --add-architecture i386
wget -nc https://dl.winehq.org/wine-builds/winehq.key
apt-key add winehq.key
add-apt-repository 'deb https://dl.winehq.org/wine-builds/ubuntu/ focal main'
apt update
apt install -y --install-recommends winehq-stable
rm winehq.key
Install .NET
wget https://packages.microsoft.com/config/ubuntu/20.04/packages-microsoft-prod.deb -O packages-microsoft-prod.deb
dpkg -i packages-microsoft-prod.deb
rm packages-microsoft-prod.deb

apt update; \
  apt install -y apt-transport-https && \
  apt update && \
  apt install -y dotnet-sdk-3.1

apt update; \
  apt install -y apt-transport-https && \
  apt update && \
  apt install -y aspnetcore-runtime-3.1
Configure Wine
echo -e 'export WINEPREFIX=~/.wine\nexport WINEDEBUG=fixme-all\nexport WINEARCH=win64' >> ~/.bashrc
source ~/.bashrc
winecfg
Download the pre-compiled ZIP containing PlutoT6 server files & IW4Admin, unzip and create a shortcut
Direct Download | Last Updated: 10/26/2021 | 1.24 GBapt install -y zip wget https://dl.axite.dev/T6-Server.zip unzip T6-Server.zip ln -s ~/T6-Server/Server/zone ~/T6-Server/Server/Zombie/zone ln -s ~/T6-Server/Server/zone ~/T6-Server/Server/Multiplayer/zoneConfigure StartT6Server.sh
cd T6-Server/Plutonium/Create a server key on https://platform.plutonium.pw and set the server hostname & game of your choosing, then edit the StartT6Server.sh file using
nanonano StartT6Server.shOnce you have pasted your key in the StartT6Server.sh file, save the file by using
CTRL + xand theny
Now we need to make sure script executable.chmod +x StartT6Server.shConfigure StartIW4MAdmin.sh
We need to make the script executable.cd T6-Server/IW4MAdmin chmod +x StartIW4MAdmin.shConfigure the dedicated_zm.cfg file for use with IW4MAdmin.
We need to set an RCON password in thededicated_zm.cfgfile so that IW4MAdmin can access it.
Navigate to the folder containingdedicated_zm.cfgcd T6-Server/Server/Zombie/main nano dedicated_zm.cfgIn this file, set a RCON password.
rcon_password "examplepassword"
Exit and save withCTRL + xand theny.Almost there!
Now you're ready to start the server. To make things easier, we'll run the PlutoT6 server & IW4Admin inscreensessions so we can easily return to them if needed and let them run in the background.Start the PlutoT6 server
screen -S t6server
cd T6-Server/Plutonium
./StartT6Server.sh
If all goes well, you should see the server start and after a few seconds you should see
Heartbeat successful.messages in the console. Now, detach from this screen session usingCTRL + aand thenCTRL + dStart & configure IW4MAdmin
screen -S iw4madmin
cd T6-Server/IW4MAdmin
./StartIW4MAdmin.sh
IW4MAdmin will present you with a configuration prompt on the first startup. You can use this guide to configure it to your liking.
The server IP should be set as127.0.0.1, and you will use the same RCON password you added todedicated_zm.cfgearlier.If all goes well, IW4MAdmin will start and connect to your sever. If enabled, the webfront will be accessible at http://0.0.0.0:1624, with
0.0.0.0being your VPS/bare-metal server's IP address.Finishing up
You can now hop in-game and claim ownership of the server and generate credentials for use on the IW4MAdmin webfront (if enabled) To do so, join your game by finding it in the server list, or in the game console use the commandconnect 0.0.0.0:4976, replacing0.0.0.0with your VPS/bare-metal server's IP address.I hope this helps! If you run into any issues please drop a comment and I'll do my best to help out.
-
Damn, Nice Guide!
-
Nice, thanks for the new guide 🧙
-
Hey man thanks for the nice guide, very easy to follow. I have one problem. My server is running and I even get the heartbeat; the problem is that I can't join ingame. The game just stays in a loading loop, it is connecting to the server because when you try to connect using an invalid ip the game just doesn't do anything. It is also missing from the server list. I think there might be something wrong with the game files, wine or my configuration, do you know what this could be? I converted the script so the game should run a normal multiplayer (t6mp) instead of zombies. Maybe I did something wrong? Do you have a working config for t6mp?
#Shell script for Plutonium T6 Multiplayer/Zombie Server on Ubuntu/Debian PAT=~/T6-Server/Server/Multiplayer #Game path KEY='SECRET' #Server key https://platform.plutonium.pw/serverkeys CFG=dedicated.cfg #Configuration file the server should use (default: dedicated.cfg) PORT=4976 #Server port (default: 4976) MODE=t6mp #Game mode ( Multiplayer / Zombie ) - ( t6mp / t6zm ) wine .\\bin\\plutonium-bootstrapper-win32.exe $MODE $PAT -dedicated +start_map_rotate +set key $KEY +set net_port $PORT +set sv_config $CFG -
Hey man thanks for the nice guide, very easy to follow. I have one problem. My server is running and I even get the heartbeat; the problem is that I can't join ingame. The game just stays in a loading loop, it is connecting to the server because when you try to connect using an invalid ip the game just doesn't do anything. It is also missing from the server list. I think there might be something wrong with the game files, wine or my configuration, do you know what this could be? I converted the script so the game should run a normal multiplayer (t6mp) instead of zombies. Maybe I did something wrong? Do you have a working config for t6mp?
#Shell script for Plutonium T6 Multiplayer/Zombie Server on Ubuntu/Debian PAT=~/T6-Server/Server/Multiplayer #Game path KEY='SECRET' #Server key https://platform.plutonium.pw/serverkeys CFG=dedicated.cfg #Configuration file the server should use (default: dedicated.cfg) PORT=4976 #Server port (default: 4976) MODE=t6mp #Game mode ( Multiplayer / Zombie ) - ( t6mp / t6zm ) wine .\\bin\\plutonium-bootstrapper-win32.exe $MODE $PAT -dedicated +start_map_rotate +set key $KEY +set net_port $PORT +set sv_config $CFGSakul I think the problem is related to your connection ports, they are probably closed (4976-4977), if you host the server on your local network you can test to join it using
connect localhost:4976orconnect localhost:4977, if all works correctly, i thinks it's your connection ports. If you use a VPS see to open your ports. -
This guide goes over the complete setup of a PlutoT6 server & IW4Admin on Ubuntu 20.04. Running Windows on a VPS or bare-metal server can be expensive with licensing costs and many server operators have a preference for Linux (myself included).
As an example, this guide will go over the setup of a PlutoT6 Zombies server & IW4MAdmin. The same concepts should apply to multiplayer, however you will need to adjust your
dedicated.cfgfile accordingly.Before we start, I'd like to give a huge shoutout to Minami for their original guide on setting up a PlutoT6 server on Debian. Many portions of their guide have been used to put together this guide.
Prepare a VPS/Bare-Metal Server
The first thing you need to do is have a VPS or bare-metal server ready to go with Ubuntu 20.04 LTS installed. We will not be using a desktop environment in this guide.The PlutoT6 server is not very resource intensive, however I recommend a server with at least 2 CPU cores & 4GB RAM for best performance.
Login to the server as root, or become root with the below command. Note: To make things easier on yourself, it's best to just use a root user. Make sure you are securing your server using key-based authentication and implement a firewall solution, for example with UFW.
sudo suUpdate apt cache and update all packages
apt update && apt -y full-upgradeInstall Wine
dpkg --add-architecture i386
wget -nc https://dl.winehq.org/wine-builds/winehq.key
apt-key add winehq.key
add-apt-repository 'deb https://dl.winehq.org/wine-builds/ubuntu/ focal main'
apt update
apt install -y --install-recommends winehq-stable
rm winehq.key
Install .NET
wget https://packages.microsoft.com/config/ubuntu/20.04/packages-microsoft-prod.deb -O packages-microsoft-prod.deb
dpkg -i packages-microsoft-prod.deb
rm packages-microsoft-prod.deb

apt update; \
  apt install -y apt-transport-https && \
  apt update && \
  apt install -y dotnet-sdk-3.1

apt update; \
  apt install -y apt-transport-https && \
  apt update && \
  apt install -y aspnetcore-runtime-3.1
Configure Wine
echo -e 'export WINEPREFIX=~/.wine\nexport WINEDEBUG=fixme-all\nexport WINEARCH=win64' >> ~/.bashrc
source ~/.bashrc
winecfg
Download the pre-compiled ZIP containing PlutoT6 server files & IW4Admin, unzip and create a shortcut
Direct Download | Last Updated: 10/26/2021 | 1.24 GBapt install -y zip wget https://dl.axite.dev/T6-Server.zip unzip T6-Server.zip ln -s ~/T6-Server/Server/zone ~/T6-Server/Server/Zombie/zone ln -s ~/T6-Server/Server/zone ~/T6-Server/Server/Multiplayer/zoneConfigure StartT6Server.sh
cd T6-Server/Plutonium/Create a server key on https://platform.plutonium.pw and set the server hostname & game of your choosing, then edit the StartT6Server.sh file using
nanonano StartT6Server.shOnce you have pasted your key in the StartT6Server.sh file, save the file by using
CTRL + xand theny
Now we need to make sure script executable.chmod +x StartT6Server.shConfigure StartIW4MAdmin.sh
We need to make the script executable.cd T6-Server/IW4MAdmin chmod +x StartIW4MAdmin.shConfigure the dedicated_zm.cfg file for use with IW4MAdmin.
We need to set an RCON password in thededicated_zm.cfgfile so that IW4MAdmin can access it.
Navigate to the folder containingdedicated_zm.cfgcd T6-Server/Server/Zombie/main nano dedicated_zm.cfgIn this file, set a RCON password.
rcon_password "examplepassword"
Exit and save withCTRL + xand theny.Almost there!
Now you're ready to start the server. To make things easier, we'll run the PlutoT6 server & IW4Admin inscreensessions so we can easily return to them if needed and let them run in the background.Start the PlutoT6 server
screen -S t6server
cd T6-Server/Plutonium
./StartT6Server.sh
If all goes well, you should see the server start and after a few seconds you should see
Heartbeat successful.messages in the console. Now, detach from this screen session usingCTRL + aand thenCTRL + dStart & configure IW4MAdmin
screen -S iw4madmin
cd T6-Server/IW4MAdmin
./StartIW4MAdmin.sh
IW4MAdmin will present you with a configuration prompt on the first startup. You can use this guide to configure it to your liking.
The server IP should be set as127.0.0.1, and you will use the same RCON password you added todedicated_zm.cfgearlier.If all goes well, IW4MAdmin will start and connect to your sever. If enabled, the webfront will be accessible at http://0.0.0.0:1624, with
0.0.0.0being your VPS/bare-metal server's IP address.Finishing up
You can now hop in-game and claim ownership of the server and generate credentials for use on the IW4MAdmin webfront (if enabled) To do so, join your game by finding it in the server list, or in the game console use the commandconnect 0.0.0.0:4976, replacing0.0.0.0with your VPS/bare-metal server's IP address.I hope this helps! If you run into any issues please drop a comment and I'll do my best to help out.
-
Sakul I think the problem is related to your connection ports, they are probably closed (4976-4977), if you host the server on your local network you can test to join it using
connect localhost:4976orconnect localhost:4977, if all works correctly, i thinks it's your connection ports. If you use a VPS see to open your ports. -
@lResxt Personally I use Contabo, the prices are not very expensive.
Minami This was one of the best websites I found when I did my research but I didn't want to use it because of the setup fees. You basically pay twice the price just because of the setup fees. Even with 3 months the setup fee alone is 5€ for me but I admit that you get a good hardware so I'll give it a try next time I try hosting. Thank you!
-
@lResxt Personally I use Contabo, the prices are not very expensive.
-
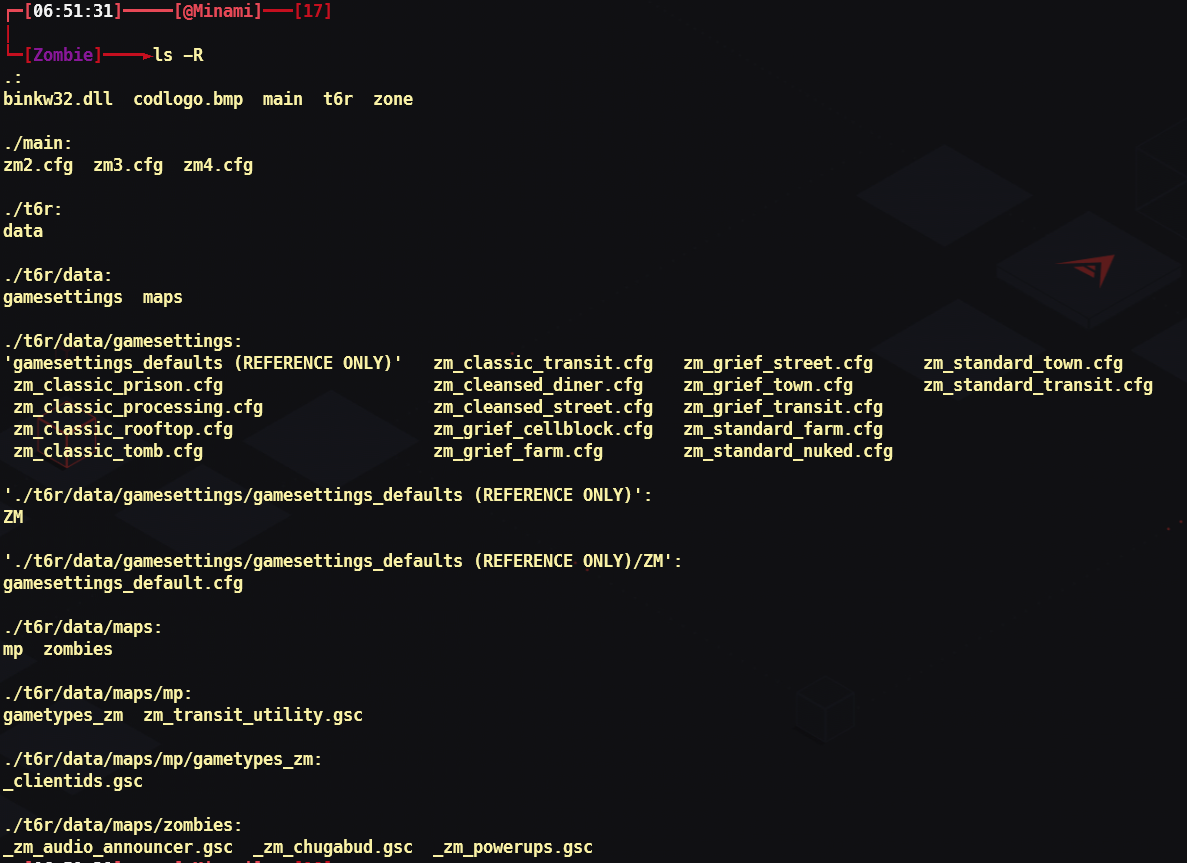
Minami Do you maybe know how to get the DLC maps working? I added them to the maprotation and added all the missing map files to the zone folder, yet the server skips the DLC maps when they are next in the maprotation.
Sakul I don't know, if you have the same configuration as here it should work. Or maybe you are missing some gamesettings. I don't think I can help you more

If it can help you here is the tree of one of my folder for zombie servers.
:::
:::
-
This guide goes over the complete setup of a PlutoT6 server & IW4Admin on Ubuntu 20.04. Running Windows on a VPS or bare-metal server can be expensive with licensing costs and many server operators have a preference for Linux (myself included).
As an example, this guide will go over the setup of a PlutoT6 Zombies server & IW4MAdmin. The same concepts should apply to multiplayer, however you will need to adjust your
dedicated.cfgfile accordingly.Before we start, I'd like to give a huge shoutout to Minami for their original guide on setting up a PlutoT6 server on Debian. Many portions of their guide have been used to put together this guide.
Prepare a VPS/Bare-Metal Server
The first thing you need to do is have a VPS or bare-metal server ready to go with Ubuntu 20.04 LTS installed. We will not be using a desktop environment in this guide.The PlutoT6 server is not very resource intensive, however I recommend a server with at least 2 CPU cores & 4GB RAM for best performance.
Login to the server as root, or become root with the below command. Note: To make things easier on yourself, it's best to just use a root user. Make sure you are securing your server using key-based authentication and implement a firewall solution, for example with UFW.
sudo suUpdate apt cache and update all packages
apt update && apt -y full-upgradeInstall Wine
dpkg --add-architecture i386
wget -nc https://dl.winehq.org/wine-builds/winehq.key
apt-key add winehq.key
add-apt-repository 'deb https://dl.winehq.org/wine-builds/ubuntu/ focal main'
apt update
apt install -y --install-recommends winehq-stable
rm winehq.key
Install .NET
wget https://packages.microsoft.com/config/ubuntu/20.04/packages-microsoft-prod.deb -O packages-microsoft-prod.deb
dpkg -i packages-microsoft-prod.deb
rm packages-microsoft-prod.deb

apt update; \
  apt install -y apt-transport-https && \
  apt update && \
  apt install -y dotnet-sdk-3.1

apt update; \
  apt install -y apt-transport-https && \
  apt update && \
  apt install -y aspnetcore-runtime-3.1
Configure Wine
echo -e 'export WINEPREFIX=~/.wine\nexport WINEDEBUG=fixme-all\nexport WINEARCH=win64' >> ~/.bashrc
source ~/.bashrc
winecfg
Download the pre-compiled ZIP containing PlutoT6 server files & IW4Admin, unzip and create a shortcut
Direct Download | Last Updated: 10/26/2021 | 1.24 GBapt install -y zip wget https://dl.axite.dev/T6-Server.zip unzip T6-Server.zip ln -s ~/T6-Server/Server/zone ~/T6-Server/Server/Zombie/zone ln -s ~/T6-Server/Server/zone ~/T6-Server/Server/Multiplayer/zoneConfigure StartT6Server.sh
cd T6-Server/Plutonium/Create a server key on https://platform.plutonium.pw and set the server hostname & game of your choosing, then edit the StartT6Server.sh file using
nanonano StartT6Server.shOnce you have pasted your key in the StartT6Server.sh file, save the file by using
CTRL + xand theny
Now we need to make sure script executable.chmod +x StartT6Server.shConfigure StartIW4MAdmin.sh
We need to make the script executable.cd T6-Server/IW4MAdmin chmod +x StartIW4MAdmin.shConfigure the dedicated_zm.cfg file for use with IW4MAdmin.
We need to set an RCON password in thededicated_zm.cfgfile so that IW4MAdmin can access it.
Navigate to the folder containingdedicated_zm.cfgcd T6-Server/Server/Zombie/main nano dedicated_zm.cfgIn this file, set a RCON password.
rcon_password "examplepassword"
Exit and save withCTRL + xand theny.Almost there!
Now you're ready to start the server. To make things easier, we'll run the PlutoT6 server & IW4Admin inscreensessions so we can easily return to them if needed and let them run in the background.Start the PlutoT6 server
screen -S t6server
cd T6-Server/Plutonium
./StartT6Server.sh
If all goes well, you should see the server start and after a few seconds you should see
Heartbeat successful.messages in the console. Now, detach from this screen session usingCTRL + aand thenCTRL + dStart & configure IW4MAdmin
screen -S iw4madmin
cd T6-Server/IW4MAdmin
./StartIW4MAdmin.sh
IW4MAdmin will present you with a configuration prompt on the first startup. You can use this guide to configure it to your liking.
The server IP should be set as127.0.0.1, and you will use the same RCON password you added todedicated_zm.cfgearlier.If all goes well, IW4MAdmin will start and connect to your sever. If enabled, the webfront will be accessible at http://0.0.0.0:1624, with
0.0.0.0being your VPS/bare-metal server's IP address.Finishing up
You can now hop in-game and claim ownership of the server and generate credentials for use on the IW4MAdmin webfront (if enabled) To do so, join your game by finding it in the server list, or in the game console use the commandconnect 0.0.0.0:4976, replacing0.0.0.0with your VPS/bare-metal server's IP address.I hope this helps! If you run into any issues please drop a comment and I'll do my best to help out.
-
Hello it's to say I did the steps and it doesn't work
-
Can you update download link please ?
-
This guide goes over the complete setup of a PlutoT6 server & IW4Admin on Ubuntu 20.04. Running Windows on a VPS or bare-metal server can be expensive with licensing costs and many server operators have a preference for Linux (myself included).
As an example, this guide will go over the setup of a PlutoT6 Zombies server & IW4MAdmin. The same concepts should apply to multiplayer, however you will need to adjust your
dedicated.cfgfile accordingly.Before we start, I'd like to give a huge shoutout to Minami for their original guide on setting up a PlutoT6 server on Debian. Many portions of their guide have been used to put together this guide.
Prepare a VPS/Bare-Metal Server
The first thing you need to do is have a VPS or bare-metal server ready to go with Ubuntu 20.04 LTS installed. We will not be using a desktop environment in this guide.The PlutoT6 server is not very resource intensive, however I recommend a server with at least 2 CPU cores & 4GB RAM for best performance.
Login to the server as root, or become root with the below command. Note: To make things easier on yourself, it's best to just use a root user. Make sure you are securing your server using key-based authentication and implement a firewall solution, for example with UFW.
sudo suUpdate apt cache and update all packages
apt update && apt -y full-upgradeInstall Wine
dpkg --add-architecture i386
wget -nc https://dl.winehq.org/wine-builds/winehq.key
apt-key add winehq.key
add-apt-repository 'deb https://dl.winehq.org/wine-builds/ubuntu/ focal main'
apt update
apt install -y --install-recommends winehq-stable
rm winehq.key
Install .NET
wget https://packages.microsoft.com/config/ubuntu/20.04/packages-microsoft-prod.deb -O packages-microsoft-prod.deb
dpkg -i packages-microsoft-prod.deb
rm packages-microsoft-prod.deb

apt update; \
  apt install -y apt-transport-https && \
  apt update && \
  apt install -y dotnet-sdk-3.1

apt update; \
  apt install -y apt-transport-https && \
  apt update && \
  apt install -y aspnetcore-runtime-3.1
Configure Wine
echo -e 'export WINEPREFIX=~/.wine\nexport WINEDEBUG=fixme-all\nexport WINEARCH=win64' >> ~/.bashrc
source ~/.bashrc
winecfg
Download the pre-compiled ZIP containing PlutoT6 server files & IW4Admin, unzip and create a shortcut
Direct Download | Last Updated: 10/26/2021 | 1.24 GBapt install -y zip wget https://dl.axite.dev/T6-Server.zip unzip T6-Server.zip ln -s ~/T6-Server/Server/zone ~/T6-Server/Server/Zombie/zone ln -s ~/T6-Server/Server/zone ~/T6-Server/Server/Multiplayer/zoneConfigure StartT6Server.sh
cd T6-Server/Plutonium/Create a server key on https://platform.plutonium.pw and set the server hostname & game of your choosing, then edit the StartT6Server.sh file using
nanonano StartT6Server.shOnce you have pasted your key in the StartT6Server.sh file, save the file by using
CTRL + xand theny
Now we need to make sure script executable.chmod +x StartT6Server.shConfigure StartIW4MAdmin.sh
We need to make the script executable.cd T6-Server/IW4MAdmin chmod +x StartIW4MAdmin.shConfigure the dedicated_zm.cfg file for use with IW4MAdmin.
We need to set an RCON password in thededicated_zm.cfgfile so that IW4MAdmin can access it.
Navigate to the folder containingdedicated_zm.cfgcd T6-Server/Server/Zombie/main nano dedicated_zm.cfgIn this file, set a RCON password.
rcon_password "examplepassword"
Exit and save withCTRL + xand theny.Almost there!
Now you're ready to start the server. To make things easier, we'll run the PlutoT6 server & IW4Admin inscreensessions so we can easily return to them if needed and let them run in the background.Start the PlutoT6 server
screen -S t6server
cd T6-Server/Plutonium
./StartT6Server.sh
If all goes well, you should see the server start and after a few seconds you should see
Heartbeat successful.messages in the console. Now, detach from this screen session usingCTRL + aand thenCTRL + dStart & configure IW4MAdmin
screen -S iw4madmin
cd T6-Server/IW4MAdmin
./StartIW4MAdmin.sh
IW4MAdmin will present you with a configuration prompt on the first startup. You can use this guide to configure it to your liking.
The server IP should be set as127.0.0.1, and you will use the same RCON password you added todedicated_zm.cfgearlier.If all goes well, IW4MAdmin will start and connect to your sever. If enabled, the webfront will be accessible at http://0.0.0.0:1624, with
0.0.0.0being your VPS/bare-metal server's IP address.Finishing up
You can now hop in-game and claim ownership of the server and generate credentials for use on the IW4MAdmin webfront (if enabled) To do so, join your game by finding it in the server list, or in the game console use the commandconnect 0.0.0.0:4976, replacing0.0.0.0with your VPS/bare-metal server's IP address.I hope this helps! If you run into any issues please drop a comment and I'll do my best to help out.
axite said in PlutoT6 Server & IW4Admin on Ubuntu 20.04:
It doesn't have IW4Admin out of the box, but it does have the server files
https://sftp.banabyte.com/dl/plutonium/server.zip -
you can run the server on linux but the bad thing is the aggressive use of the cpu is there a way that when using wine the use of the % of the cpu is lower?
because I uploaded a test server when the % is filled the cpu goes up causing lag and jerks to the players
My discord in case you can help me
VZLAxSmoke#8458
Thanks !! -
axite said in PlutoT6 Server & IW4Admin on Ubuntu 20.04:
It doesn't have IW4Admin out of the box, but it does have the server files
https://sftp.banabyte.com/dl/plutonium/server.zip

Hello! It looks like you're interested in this conversation, but you don't have an account yet.
Getting fed up of having to scroll through the same posts each visit? When you register for an account, you'll always come back to exactly where you were before, and choose to be notified of new replies (either via email, or push notification). You'll also be able to save bookmarks and upvote posts to show your appreciation to other community members.
With your input, this post could be even better 💗
Register Login