[Headless] Plutonium IW5 Linux Server Setup

-
Hello Everyone,
Today I am going to show you how to setup a Plutonium IW5 Server using Linux.
The distro I will be using is Ubuntu 18.04 Bionic however anything above 16.04 should be fine. You will probably be able to infer these commands to Centos/RHEL Distros.VPS/Dedi Setup
First things first you need to get yourself a VPS/Dedicated Server with Ubuntu installed and Ideally have root access.
Lets update the server and get it up to date.
apt-get update && apt-get upgrade -yWe will then setup a basic firewall with fail2ban to automatically ipblock users trying to brute force into the server.
apt install -y ufw fail2ban && \
ufw allow 22/tcp && \
ufw default allow outgoing && \
ufw default deny incoming && \
ufw enable
Installing Wine
Wine has been around for a long time, but its still awkward as ever to get setup nicely. The latest version has had a lot of fixes so we are going to be installing that.
## Allow i386 Architecture dpkg --add-architecture i386 && \ apt-get update && \ apt-get install wget gnupg2 software-properties-common -y- Ubuntu 16.04
apt install -y apt-transport-https ## We will now setup the winehq key and repo wget -qO - https://dl.winehq.org/wine-builds/winehq.key | apt-key add - && \ apt-add-repository 'deb https://dl.winehq.org/wine-builds/ubuntu/ xenial main' apt-get update ## Now we will install wine apt-get install -y --install-recommends winehq-stable- Ubuntu 18.04
## We will now setup the winehq key and repo
wget -qO - https://dl.winehq.org/wine-builds/winehq.key | apt-key add - && \
apt-add-repository 'deb https://dl.winehq.org/wine-builds/ubuntu/ xenial main'

apt-get update

## Now we will install wine
apt-get install -y --install-recommends winehq-stable
The next part of this guide should be conducted on the user you want to run the IW5 Server. e.g. plutouser. For this example I will be using the root user.
Wine Configuration
We are now going to configure a wine prefix and some env variables to get rid of those pesky warnings.
## Add Variables to the environment at the end of ~/.bashrc
echo -e 'export WINEPREFIX=~/.wine\nexport WINEDEBUG=fixme-all\nexport WINEARCH=win64' >> ~/.bashrc

## Update our session
source ~/.bashrc

## Configure our wine environment
winecfg
Congratulations, wine is now installed and enabled with a 64 bit prefix.
Plutonium Dedicated Server Setup
Installing Plutonium Bootstrapper
We are now going to install the bootstrapper which we only need one installation for if configured correctly when it comes to logging. However we will touch on that later.
## Change to the home directory
cd ~/

## Install the plutonium files into ~/pluto
wget https://cdn.plutonium.pw/updater/plutonium -O plutonium && \
chmod +x ./plutonium && \
./plutonium -install-dir ./pluto
Now the bootstrapper is installed and ready to use.
Installing the base game server files.
So before we can start configuring our server we first need to source the files. I recommend using SteamCMD.
## Install SteamCMD
add-apt-repository multiverse && \
apt update && \
apt install lib32gcc1 steamcmd -y

## Install the server files into ~/server e.g. /root/server
steamcmd +@sSteamCmdForcePlatformType windows +login <STEAMUSERNAME> +force_install_dir ~/server +app_update 42750 validate +quit

## Delete steam_api.dll from the directory
rm ~/server/steam_api.dll
Once the above is complete we have the bootstrapper and the server files ready. We can now start configuring.
Creating the server.cfg
Now you can name this whatever you want however for simplicity I am going to useserver.cfgHead over to the
~/server/adminfolder and delete/replace the server.cfg with the following:ENSURE TO READ THE WHOLE CONFIG LINE BY LINE AND MAKE MODIFICATIONS
// Pluto IW5 Server Configuration

// Server host name
// This is only used for the title of the command window/IW4MAdmin. To set the hostname for the server go to:
// https://platform.plutonium.pw/serverkeys
seta sv_hostname "Plutonium Server IW5"

// Server MOTD
// This is displayed on the loading screen below the loading bar.
seta sv_motd "My default server MOTD"

// Map Rotation
seta sv_maprotation "dsr TDM_default map mp_alpha map mp_bootleg map mp_bravo map mp_carbon map mp_dome map mp_exchange map mp_hardhat map mp_interchange map mp_lambeth map mp_mogadishu map mp_paris map mp_plaza2 map mp_radar map mp_seatown map mp_underground map mp_village"

// Maximum number of clients that may connect to this server (range 1-18)
seta sv_maxclients 18

// Server password. If set, users will be prompted on join attempt.
seta g_password ""

// Default Gametype
// seta g_gametype "ffa"

// Server Log File
// This can also be set on the command line, which may be better for hosting.
seta g_log "games_mp.log"

// Remote console password. If set, users will have access to a remote console, allowing server administration from a connected client.
seta rcon_password "plutonium"

// Change the name of the console
seta sv_sayName "Server"

// Allow double tap on weapon switching.
seta sv_enableDoubleTaps "1"

// Disable bounces.
// seta sv_enableBounces "0"

// Toggle voting for [player kick/map restart/next map] (0 or 1 (default) )
seta g_allowVote 1

// Toggle allowing dead players to chat with living players (0 (default) or 1)
seta g_deadChat 0

// Time in seconds before the server will kick a user for inactivity (range 0 - 10000)
seta g_inactivity 120

// Toggle flood protection (throttling of user commands - should be enabled for non-password-protected Internet servers) (0 or 1 (default))
seta sv_floodProtect 1
Key Things:
seta sv_enableDoubleTaps "1"
This enables doubletaps on weapon changes, if you want to disable this comment the line out or set to 0.seta g_log "games_mp.log"
This must be unique per server instance, so if you are running multiple servers change this for example toserver1.logENSURE TO READ THE WHOLE CONFIG LINE BY LINE AND MAKE MODIFICATIONS
Getting a server key
In Plutonium we have built our own tooling, and as such to authenticate and tie a server to a specific person and allow us to control blacklisting. You will need to get a server key from: https://platform.plutonium.pw/serverkeys
First you need to set a hostname and also the game, which in this case is IW5MP
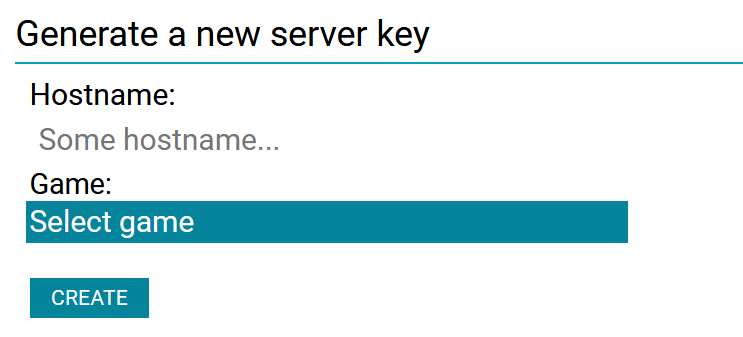
Once you click create, a new row will be added to the table below. Which will contain the hostname, server key, last used date and creation date. The hostname can be editted by clicking the green cog on the right hand side.

If you hover of the key field, it will show you your key which you will need to copy/need in the next step.
Starting the server
Awesome, we are so close to getting our server online and showing in the server list. We need to decide on the port our server will run. The default is 27016 however this can be changed / if you want to host multiple servers.
I am going to use
27016, now if you remember we locked down the ports for incoming traffic, which our server now needs. To do this I will open up traffic on port27016with the following command.ufw allow 27016 comment PlutoIW5Server1 && \ ufw reloadOur port is now open so when we start the server people will be able to connect to it.
Next up the server run command
- You will need to know your Server Key
- You will need to change server.cfg to whatever you called your config. (if you followed this guide its server.cfg)
- The port you chose e.g. 27016
## Head back to our plutonium directory.
cd ~/pluto

## Start our first server
wine .\\bin\\plutonium-bootstrapper-win32.exe iw5mp ~/server/ -dedicated +start_map_rotate +set key <SERVERKEY> +set net_port 27016 +set sv_config server.cfg
Give it a few seconds to boot up.... and boom there it is in the server list waiting for you and your friends to join.
-
How can I make my server install smaller?
Main Folder
Only these files are needed in the main folder to run a server.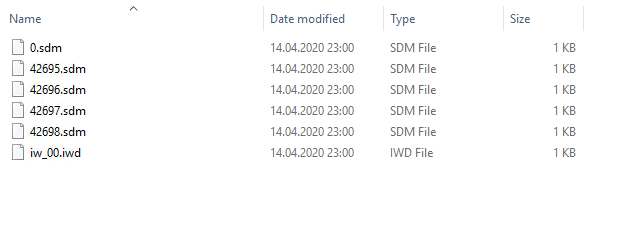
-
reserved
-
reserved
-
reserved
-
reserved
-
 Example6428 referenced this topic on
Hello! It looks like you're interested in this conversation, but you don't have an account yet.
Getting fed up of having to scroll through the same posts each visit? When you register for an account, you'll always come back to exactly where you were before, and choose to be notified of new replies (either via email, or push notification). You'll also be able to save bookmarks and upvote posts to show your appreciation to other community members.
With your input, this post could be even better 💗
Register Login