I got it confirmed that's it's an issue with plutonium. I guess I won't delete the thread as a confirmation for others searching for a solution.
Posts
-
Changing language files to japanese -
I cannot find matchCano77__Ribe That is not how this works. You have to go into the server browser and choose a server to join.
-
Hello! -
Changing language files to japaneseI got a guy trying this on his PC and this is the result he got.

You can somewhat see the characters but it's still pretty scuffed. -
Changing language files to japaneseSo..
I won't go into detail on how I acquired these files but I came across these japanese mw3 language files and thought it would be fun to change my game language to japanese.
However, when I try to change my game language the text is not showing correctly.
This text is not only showing like this in the main menu but in game as well. It's either weird symbols or the text is simply not showing.You might jump to the conclusion that the files are corrupted but I actually got them working on Steam so I don't think that's it.
I've tried multiple stuff; using the english localization file, changing the text inside of that localization file back and forth from english to japanese etc. I've tried renaming the files. A lot of these things I tried gave me errors which made me not even able to open the game. But the thing I did to have the game atleast open for me is to just drag and drop the japanese language files, and replacing the localization.txt file to the japanese one.My personal conclusion is that it's a client-based problem with plutonium. It's like when you try to view certain characters in windows or whatever when they're not supported. There's no problem changing the game language to other languages. Perhaps this doesn't work because it's not a supported language in Steam in the EU and NA region. Although, russian isn't either but that works apparently.
If it's actually true that it's a plutonium error thing it would be awesome if we got japanese characters supported. It's just another way enabling us to modify the game even more which is a fun hobby to must of us. If it's a problem with my client, then please help me

-
[Web] Plutonium Server ListVERY POG
-
Private Match with friends?If you browsed the forums a bit you would find this forum post made by H3X1C
https://forum.plutonium.pw/topic/1239/private-match-with-friends
-
Is this legal?omegafuckinglul
-
[Release] Rainbow Gold CamoNejeko Late ass answer but make sure you have the ~detail .iwi files in the images folder. both of them
-
[Release] Rainbow Gold Camo -
[Release] Rainbow Gold CamoThis camo replaces your gold camo.
Put the .iwi files in %LocalAppData%\Plutonium\storage\iw5\images folder.
Download
Edit:
Added rainbow gold in menu as well.
Preview: (I can't change the camo name in-game sadly.)

Credit: feel#0001 (me
") )
)Previews:
(It looks more shiny when you're actually playing)


-
[Linux/Ubuntu] VPS and Server Setup for IW5SoyRA I did use it for simplicity and maybe laziness
 I've used it before and I found your installing wine and user creation guides to be simple and beginner friendly. If you want credits I can give it to you in the post
 -
[Linux/Ubuntu] VPS and Server Setup for IW5READ
We will go over how to setup your VPS from the beginning and how to host a server on it. If you're experienced with Linux and have it setup to your liking you can jump over the VPS setup. On the VPS setup we will install a Desktop and Xrdp which will make it possible to connect to your VPS with Windows remote desktop connection. I'm using Ubuntu 16.04 for this tutorial and I'd recommend you installing it on your VPS. If you already have another OS installed and you're not good with linux, you should restore the vps and install Ubuntu 16.04.
Requirements
-
A VPS with Ubuntu
If you're experienced with Linux and have your own desired OS you don't have to use Ubuntu. But for beginners;
Preferably use Ubuntu 16.04 -
A clean copy of Modern Warfare 3
-
The PlutoniumIW5 patch installed
You install it by running the launcher in your Modern Warfare 3 folder -
Some knowledge about Linux.
-
General knowledge about setting up a MW3 server.
-
An SSH client
Preferably PuTTY -
FTP connection
Using vsftpd and FileZilla
Open ports and firewall
On most VPSs all of your ports are already open so you don't need to do anything there. As far as I know you don't need to allow anything inside your firewall. If this is the case, then just google it
 Make sure to allow "plutonium-bootstrapper-win32.exe" inside /home/"name"/.wine/drive_c/users/"name"/Local Settings/Application Data/Plutonium/bin. The port you need to open is 27016. This is the net_port but you can always change it inside server.cfg.
VPS Setup
I'm assuming you know how to connect to SSH and logging in to root.
Let's start by executing the following commands:sudo apt-get update sudo apt-get upgrade # If you get a pink pop up called grub or something, just pick the first drive and click Yes when it's asking if you want to continue without installing grub. # There will pop up another window with multiple alternatives to choose from, keep the currently installed (it doesnt say that, but something along those lines) # Create a user give it a password. # You shouldnt use root to run the server or any other command. sudo adduser "name" sudo passwd "password" # Giving sudo power to the user sudo usermod -aG sudo "name" # Change to your user su "name" # Install Ubuntu Desktop sudo apt-get install -y ubuntu-desktop sudo apt-get install xrdp # Installing Xfce4 for a lighter desktop interface than GNOME sudo apt-get install xfce4 sudo apt-get install xfce4-goodies echo xfce4-session >~/.xsession"name" = your desired username
"password" = your desired passwordEditing Xrdp to use the same port all the time
Edit xrdp.ini by typing: sudo nano /etc/xrdp/xrdp.ini
In xrdp1 change port=-1 to port=ask5910.
Save the xrdp.ini file by pressing CTRL+X>Y>Enter
Run these commands:
sudo service xrdp stop
sudo service xrdp start
echo xfce4-session >~/.xsession
Connecting to Xrdp with Windows
- Open Remote Desktop Connection by pressing Windows Key + R and type "mstsc"
- Type in your VPS IP and connect. (Press "yes" on any window that may come up)
- You should see a window that looks like this:
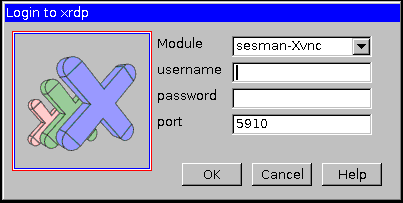
Your port might be a different value. I can connect with either 5910 or -1 so you should try both of those values.
Login like you would to an SSH connection but login with the user you made. - You should now be logged in on a desktop. Now, you can either close the connection and type in your SSH client or open a terminal in the desktop connection and continue.
Installing Wine
Type the following commands in either a terminal or in your SSH client
# If the system is x64, the x86 architecture must be enabled.
sudo dpkg --add-architecture i386

# Download and add the repository key.
wget -nc https://dl.winehq.org/wine-builds/winehq.key
sudo apt-key add winehq.key

# Add the repository.
# Add the PPA.
sudo apt-add-repository 'deb https://dl.winehq.org/wine-builds/ubuntu/ xenial main'
sudo add-apt-repository ppa:wine/wine-builds

# Update the packages.
sudo apt update

# Install the Stable Wine Branch.
sudo apt install --install-recommends winehq-stable

# If you get "unmet dependencies error" during installation, use the following commands to install Wine using aptitude:
sudo apt install aptitude
sudo aptitude install winehq-stable

# If everything went OK, you can check your Wine version using the following command.
wine --version
Installing Google Chrome
You might need a web browser. There are pre-installed ones but I like google chrome overall.
Type this in your terminal:wget https://dl.google.com/linux/direct/google-chrome-stable_current_amd64.deb sudo apt install ./google-chrome-stable_current_amd64.debChrome should be in Applications>Internet but if it isn't you can simply type google-chrome in the terminal.
How to get your server folder with Plutonium launcher
For this we will use an FTP connection with FileZilla to transfer your whole plutoserver folder to your VPS. I will explain how to ready up your folder so it doesn't take so much space.
Getting your server folder ready
- Get a clean copy of MW3 from Steam and if you don't own it, get the dedicated server files.
- Go to your "main" folder and delete everything except 0.dm and iw_00.iwd.
That is basically all you need to save as much space as possible. There are probably more files that is not necessary but nothing that lose you much space.
Installing vsftpd and FileZilla
- Type the following in a terminal:
sudo apt-get install vsftpd - Edit vsftpd.conf so you can allow writing:
sudo nano /etc/vsftpd.conf - Find the line that says "#write_enable=YES"
uncomment it by removing the "#" - Save the file by pressing CTRL + X and press yes and then enter.
- Install FileZilla Client on your PC.
Transfering files with FileZilla
- Connect to your VPS with IP and the user you login to your VPS with (not root) and choose port 22 to connect with. Default (21) is not a secure connection.
Left side is your PC, right side is your VPS. Let's start by deciding where you want your server folder.
I recommend just putting it on your desktop for accessability. - Go to the right side and expand the folder that has your username and choose desktop.
- Go to the left side and find your server folder. If you got it from steam and installed in the default location it should be: C:\ProgramData\Steam\steamapps\common\Call of Duty Modern Warfare 3
- Right click your server folder and press "Transfer/Send". Make sure that you have opened the desktop folder on your right side.
- You should have your server folder on your ubuntu desktop. I recommend you to rename it to plutoserver for the sake of the guide.
Install plutonium patch.
- Download plutonium launcher from here: https://cdn.plutonium.pw/updater/plutonium.exe (download it on your VPS with google chrome)
- Now move the launcher to your server folder.
- Right click inside your server folder and click Open in Terminal
- in the terminal type: wine plutonium.exe
- It will download the patch and after that it will try to open the launcher but it can't. That doesn't matter because we don't need it.
Now you should have a Plutonium-staging folder created in local appdata which you can find by going to the next step of this tutorial.
Server key
You need a server key to get your server featured on the server list. You can get your own server key by going to this site: https://platform.plutonium.pw/serverkeys
Choose the server name in Hostname and select IW5MP in Game and then press create.
! Do not skip choosing a hostname because you think choosing a name in server.cfg is enough. Your server won't be able to run without a hostname.
You will copy paste this server key inside your .bat file.Create your .bat file
Right now of me creating this tutorial .dsr and .dspl is not supported. So you will have to type your map rotation in your server.cfg and you will have to set with the default gamemodes. I will edit this tutorial when/if this will be supported. If you want to change time and score you can do that through rcon but that you will have to find out yourselves.
-
Go to your home directory click on view>Show Hidden Files.
-
Go to this directory: /home/"name"/.wine/drive_c/users/"name"/Local Settings/Application Data/Plutonium
-
Create a .bat file in here by right-click>Create Document>Empty File
-
Rename it to startserver.bat
-
Open it with gedit and copy paste the following:
@echo on
.\bin\plutonium-bootstrapper-win32.exe iw5mp "/home/"name"/Desktop/plutoserver/" +set key *key* -dedicated
pause
Launching your server
Launching the .bat file
- Right-click inside Plutonium folder and click Open in Terminal.
- Type: wine cmd
It will load a windows cmd. - Now type: startserver.bat
It will spam a lot of MSVCRT stuff but you don't have to care about that. Just wait for it to be done spamming.
Your server is not running yet because you need to start a map rotation. You can set a map rotation by typing for example:
set sv_maprotation "map mp_dome dsr TDM_default map mp_seatown dsr FFA_default"This will first run Team Deathmatch on Dome and then Free For All on Seatown.
To actually start the map rotation, simply type:
map_rotateUnfortunately your map rotation doesn't save for now so you have to type your whole map rotation in the bootstrapper everytime. I recommend making a .txt file and create some map rotations in there which you can just copy and paste into the bootstrapper/server exe.
Change process affinity for maximum performance
By default, the plutonium bootstrapper (server exe) is running on one single core. We want to use all of our cores so we get the best performance for our server. To do this we run this command line:
taskset -cp CORENUMBER PROCESSIDThe corenumbers on Linux works like this:
If you have 4 cores, core #1 has corenumber 0. Core #2 has corenumber 1 and so on.
What if you want core #2 and #4 to run the server? Then you can do:taskset -cp 1.3 PROCESSIDIf you want all of your 4 cores to run the server you can do:
taskset -cp 0-3 PROCESSIDTo find the Process ID (PID) of the bootstrapper you open the Task Manager in Applications>System (while your server is running) and find plutonium-bootstrapper-win32.exe. The PID number should be the number right of the task name.
! The Process ID changes everytime you re-launch the application and changing process affinity doesn't save so, you will have to repeat this process everytime you restart your server.
Example:
taskset -cp 0-3 10550
Installing IW4MAdmin (coming soon)
Running multiple servers (coming soon)
Now you should have a server running! Good luck.
If you have any issues, dm me on discord @ feel#7777Credits: SoyRA for letting me borrow a bit of his guide.
-
-
Time for another progress update. -
A small update on what we have been working on!I can't wait for IW5

-
Server advertising, promotion and introduction thread.Aspire Sniping
Aspire FFA iSnipe (reg-gun servers added soon)
- Sniper Only
- No shock charges, stuns, flashes, sensor grenade etc
- Miniscule health
- Last nice is not mandatory
- Right now we only have Nuketown and Raid 24/7 but more servers will be added
We are Aspire, a clan originally coming from MW2, founded by Aspire Zak.
After some time of inactivity, we are finally back to CoD, currently with around 25 active members.
We are dominating games like MW3, Black Ops 2, CoD 4 and MW2 (IW4X).
Don't let our clan name fool you. Aspire is both a sniper and reg-gun clan and our players are highly skilled in both matters. We are always searching for more people to join us so if you feel interested, you will find our discord below.
You can always join our discord without the intent of joining our clan and talk with us. If you somehow got wrongfully banned, come here and we'll see what we can do about it!Aspire leader w1red is a moderator at Plutonium with Aspire member feel being a VIP and server hoster